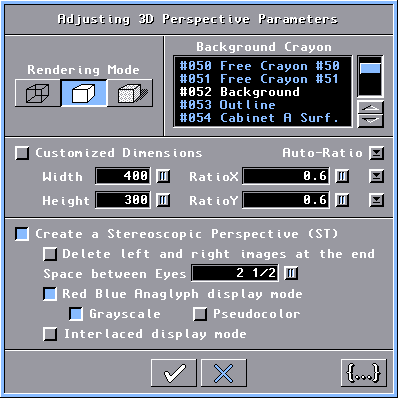
8- How to access the stereoscopic left and right images separately.
When
you activate the Create a Stereoscopic Perspective button, the
Scene Editor program renders an image for your left eye ("....\DecoTech\Images.ct\~Stereo -
Left Image.bmp")
and another image for your right eye ("....\DecoTech\Images.ct\~Stereo - Right Image.bmp").
When the two images are completed, they are automatically
merged into a Red Blue Anaglyph or an Interlaced stereoscopic 3D
perspective image that is displayed on screen. (Special glasses are required to view stereoscopic 3D
perspectives.) In order to free hard disk space, the two
temporary images are automatically deleted. To avoid this
deletion, simply unselect the Delete left and right images at the
end button.
When the Smooth Shading
rendering mode is activated, these two images are
24 bits image files, otherwise they are 8 bits image files.
When you select an Interlaced stereoscopic 3D,
the height of the two
images is the half of the normal
height. When the normal height is odd, the left image has one
more line. You can obtain left and right images with normal
height by doing the following :
1- Select the Customized Dimension
button.
2- Enter the normal width in the Width text box.
3- Enter the double of the height in the Height text box.
4- Manually set RatioX and
RatioY appropriately or
click the Auto-Ratio button.
(The Auto-Ratio button uses a simple
function : RatioX =
Width / 640. RatioY
= Height / 480.)
So if you want to keep the left and
right
image files after the rendering of a specific 3D perspective, simply
rename the two image files
to something else but keep the ".BMP" extension. You
can use those image files into other programs that support
stereoscopic display like the Stereo
Image Maker software.
If you render a sequence of images
(animation), the left and right images will be saved into the "....\DecoTech\Cellules.ct\"
folder but the frame number will be also added to prevent overwriting.
(Example : "~Stereo - Left Image #0001.bmp".

|